Help Center
Do you have questions about our guitars, want to learn more, or need a repair? Then you've come to the right place!

Questions & Answers
Many questions, many answers. Your question may already be answered. Search our FAQ below or feel free to browse the questions.
General 13
Can I buy a guitar directly from Lakewood?
If there’s no dealer in your area and you don’t have a local contact, you can buy your future Lakewood guitar from us at the recommended retail price (RRP).
If you’ve already been in touch with a Lakewood dealer to learn more about our guitars, you’re still very welcome to visit us and choose your personal instrument in our large showroom – or even order a Customshop guitar. In that case, you’ll make the payment through your Lakewood dealer.
Which music dealers stock Lakewood Guitars?
Can I deliver my own timber for building of a Lakewood guitar?
How did the trade name "Lakewood" come about?
Where are Lakewood Guitars manufactured?
Where can I register my guitar?
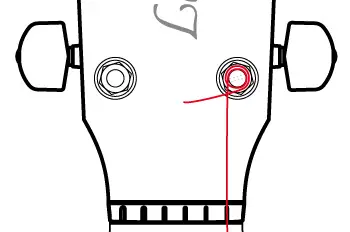
Where do I find the Model and serial number?
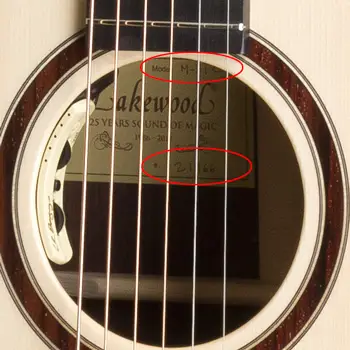 The model description and serial number may be found on the label located inside the guitar, visible through the sound hole.
What do the letters and numerals of the model names mean?
When (in what year) has my guitar been made?
The serial numbers can be assigned to the year of making. Here's a breakdown:
Serial number (from - to) / manufacturing year
195-461 / 1986
462-1150 / 1987
1151-1912 / 1988
1913-2707 / 1989
2708-3683 / 1990
3684-4847 / 1991
4848-5666 / 1992
5667-6464 / 1993
6465-8277 / 1994
8278-8722 / 1995
8723-9590 / 1996
9591-10129 / 1997
10130-10631 / 1998
10632-11151 / 1999
11152-11899 / 2000
11900-12702 / 2001
12703-13648 / 2002
13649-14629 / 2003
14630-15489 / 2004
15490-16327 / 2005
16328-17142 / 2006
17143-17938 / 2007
17939-18776 / 2008
18777-19626 / 2009
19627-20449 / 2010
20450-21383 / 2011
21384-22260 / 2012
22261-23316 / 2013
23317-24404 / 2014
24405-25414 / 2015
25415-26533 / 2016
26534-27705 / 2017
27706-28764 / 2018
28765-29975 / 2019
29976-31180 / 2020
31181 - 32397 / 2021
32398 - 33466 / 2022
33467 - 34776 / 2023
34777 - 36054 / 2024
36055 -
What is the term of the Lakewood warranty?
The terms of our warranty may be found here.
My guitar needs a repair. How should I proceed?
Are there factory tours at Lakewood?
Does a new guitar make happy?
Problems and solutions 16
Do you also repair guitars from other brands?
Yes!
That’s exactly what our Guitar Competence Center is for.
You can find all the information at https://de.guitarhelp.eu/
Pickup system malfunction
General
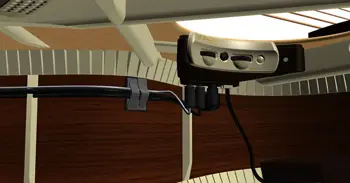
The L.R.Baggs Anthem System includes a control unit which is located under the sound board at the sound hole by means of three permanently elastic adhesive pads.

The available controls are - volume, microphone blend, a phase switch and a battery check by means of five LED lights. A piezo element is located under the saddle and a microphone is secured by way of two adhesive pads under and just behind the bridge.
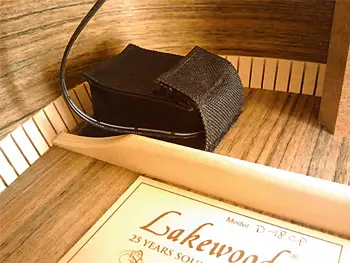
Both the element and the microphone are electronically connected by way of coaxial cable and 2.5mm plugs. The jack plug insert, which simultaneously serves as a strap button, is located in the center of the wooden block at the back end of the guitar. The connecting cable from the input jack is plugged into the control unit by way of a square locking connector and is secured to the inside walls of the body by way of cable holders. The connecting cables for the microphone and piezo are similarly secured to the sides and top by way of cable holders. The necessary 9-Volt battery is contained in a Velcro-sealed pocket placed on the floor of the body and connected to the control unit by way of a cable.
Technical Data
Output Impedance: 620 Ohm
Power consumption: 3.5 mA
Battery Life: ca. 170 h (depending on battery type)
Weight (incl. 9V battery): 162 g
Frequency response: ~60 - 250Hz (Piezo) ~250Hz - 20kHz (Microphone)
Common Problems
Output jack
A faulty connection, which interrupts the signal briefly when the plug is moved. This fault can be due to the use of an inferior jack plug whose diameter is less than 6,35mm.
Solution: replace the lead cord.
Piezo Element (bridge pickup)
Uneven string volume
Solution: request a replacement saddle/insert from service@lakewood.de. Minimal differences in the material can influence the string balance. Should a replacement insert not resolve the issue, the piezo element will need to be replaced.
Microphone
No problems reported to date.
Control Unit
Vibration noise may arise with all moveable or parts of either the electronics or the housing. Vibrations caused by the volume and blend knobs.
Solution: replacement of the control unit
Defective phase switch
Solution: replacement of the control unit
No audible signal
Solution: replacement of the control unit because of likely electronic failure
Queries
Can I resolve issues with the L.R.Baggs system myself?
Answer: In most cases this is not possible. Please refer the issue to service@lakewood.de
What is the warranty period for pickup systems?
Answer: the warranty period is 2 years from the date of purchase of a new guitar from an authorized Lakewood dealer.
Can feedback arise when using the pickup system?
Answer: Yes, depending on the ambient acoustics and the amplifier used, feedback may arise with increasing volume levels.
Does the installation of electronics and a pickup affect the acoustic tone of the guitar?
Answer: Although all installations entail introducing a ‘foreign object’ the actual tonal impact generally cannot be aurally detected.
Can the L.R.Baggs system be removed from the guitar?
Answer: Yes the system can be removed. The piezo, microphone and control unit can all be removed without any impact. The input jack can be replaced with a mahogany dowel and a strap button.
The string action is uncomfortable
I think the neck has warped
The curvature of the soundboard appears to be excessive
The curvature is naturally impacted by pull from the strings; flattens out slightly between the bridge and sound hole and becomes a little stronger behind the bridge. These changes are normal and do not affect the instrument. Should you detect patent or irregular changes in the soundboard curvature of your guitar, please contact us by email on service@lakewood.de.
The frets are uneven and worn
General
Frets are positioned in semitone intervals at calculated positions on the fret board. These positions determine the correct intonation of the instrument. The positions must obviously be correct from the start and they will remain unalterable thereafter. As a result, fret inaccuracy would hardly ever be applicable; instead it is more likely for an instrument to be inaccurate in regard to the octave position.
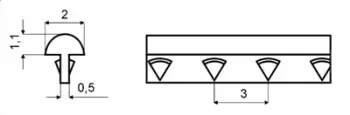
Frets are made of a copper, nickel and zinc alloy, sometimes referred to as ‘new silver’ which arose from the silvery gloss of the material, which does however not contain any silver.
The fret wire used by Lakewood is of medium hardness and gauge as shown in the diagrams below. Also visible are the diamond-shaped barbs which help to retain the frets in their slots on the fret board. Frets are not glued so that they can be removed without damaging the fret board.
Assessing the fret surfaces
Frets have a curved surface to provide the strings with a well-defined contact point. This point will wear over time which will eventually lead to fret buzz or intonation problems. The more an instrument is played or the heavier the string gauge or the harder strings are fretted, the deeper the fret grooves will become. This will be acceptable for some time, until the grooves become such that a fret-dressing or replacement becomes necessary.
Dressing and replacement of frets
Both the dressing and replacement of frets must be handled by qualified technicians. You may gladly contact service@lakewood.de per email and please enclose a photograph on which the fret grooves are visible. We will then let you have an estimate of the repair costs.
Problems and Questions
- Individual frets are loose.
Answer: Please contact service@lakewood.de - Does fret-work fall under the Warranty?
Answer: This work is not covered by the warranty. - Would it be better to use very hard fret wire?
Answer: Not necessarily, harder fret wire leads to more string wear - Is it sensible to use higher or wider fret wire?
Answer: No, higher frets require a significantly more disciplined playing technique because strings hardly have any contact with the fret board. Broader frets can impede precise intonation.
One or more strings are rattling / buzzing
General
Please rest assured that a ‘rattle-free’ guitar has not yet been built and that we may expect the rules of physics to apply into the future.
Rattle occurs when vibrating strings make contact with the frets. The vibrations interfere with the string oscillation and lead to an impure sound. The energy in the string is partially absorbed by the rattle which leads to a quicker decay of the tone.
Causes of rattle (fret-buzz)
Rattling of strings may be due to a number of causes. Imprecise playing technique in either left or right hand often leads to string rattle. The fretting of a string (finger placement vis-à-vis the fret) may cause unwelcome vibrations.
On over-powerful strum with the right hand or the equivalent of a flamenco-like Apoyando can drive the vibrating string too close to the fret board.
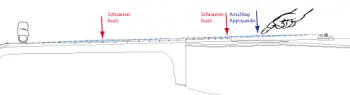
These aspects of technique should be critically evaluated as they can either themselves or in conjunction with characteristics of the guitar be lead to string rattle.
Naturally, there are other causes of string rattle:
- Worn or faulty strings are the most common cause
- A string action unsuited to the guitarist’s playing style (see the section How can I measure and adjust the action of my guitar?)
- Uneven fret height (see the section on The frets are uneven and worn)
- Incorrect adjustment of the truss rod (see the section on How do I adjust the truss rod?)
- Excessive notch depth of the nut (see the section on How the nut can be checked)
Subjective perception
What may seem unacceptable string rattle to one player might not bother another and even be appealing to a third player who chooses this as his preferred musical ‘sound’. While we don’t intend to persuade any player to accept a rattling guitar it might be good to put one’s own perception into perspective. Strictly speaking, no guitar is rattle-free; indeed you can express and emphasise these sounds. To focus on these tones unduly might lead to an eventual loss of pleasure in the music.
Technical flaws must clearly be eliminated but, realistically, only in sync with improvement of the player’s technique.
Unwanted noise while playing
There may be unwanted vibrations which disturb the pure sound of the guitar. The definition, identification and treatment of these can be laborious but, if systematically addressed, can be successfully removed.
Vibrations while playing
Vibrations are always mechanical in nature. A guitar consists of numerous components, not all of which are secured by means of glue. These may loosen and cause unwanted vibrations at certain frequencies during playing. To pin-point such an item, you should proceed methodically, step by step, starting at the head stock.
Tuners (machine heads)
Check the functioning and positioning of the tuners. For more information, go to Care and maintenance of the machine heads (tuners).
Strings
Check if there is a string buzz/rattle. Refer to the sections on One or more strings are buzzing and How can I measure and adjust the action of my guitar in the FAQ section.
Correct stringing of the guitar
For the correct securing of strings at the tuners and the bridge, please see How do I restring my guitar in the FAQ Section.
Nut
Check the secure placement of the nut and the level of the nut grooves; see How the nut can be checked in the FAQ Section.
Frets
Check the fret ends for firmness and the fret surfaces for playing marks. See The frets are uneven and worn or Checking the fret ends in the FAQ Section.
Truss rod
Check the proper setting of the truss rod. See How do I adjust the truss rod in the FAQ Section.
Saddle
Check the surface of the saddle (bridge insert). Grooves in the material can give rise to unwanted vibrations and to address these, see How the saddle can be checked in the FAQ Section.
Braces
Check that the braces under the soundboard and in the body of the guitar are secure.
Pickup and Electronics
Built-in pickup systems can give rise to vibrations. Both cables and moving parts of the pick-up system may vibrate at particular frequencies. Read more on this in the FAQ section under Pickup system malfunction.
The wooden machine head button is slipping
The wooden buttons have a metal bearing. The connection between the button and its bearing can become compromised leading to tuning difficulties. In addition, an inadequate binding between the button and its bearing may cause vibrations. In this case it is necessary to remove the button from the tuning shaft. Detune the string by at least one tone and release the retaining screw at the head of the tuner button with a suitable screw driver. Take care when removing the button from the shaft that the two washers (one metal and one plastic) remain on the shaft. These are essential for the proper functioning of the tuning mechanism. Remove the tuner button from the shaft and then withdraw its metal bearing which can then be re-fitted with a small measure of “Superglue”. Wait a few minutes before re-assembling the tuner.
If you are unable to undertake this repair, a replacement can be obtained from us at service@lakewood.de.
Some strings are breaking repeatedly
String breakages can be due to faulty material. In most cases, however, this is due to other causes. Check your playing technique critically. Particularly powerful strumming, especially near the bridge can take strings beyond their limits. Other causes include sharp edges on the saddle which may have developed from usage over time. Check the area of the saddle which is in contact with the string. If you detect a definite groove or sharp edge, remove the saddle and re-polish the rounded upper edge with fine water paper (i.e. grit of 320 plus) to allow the string to pass freely over the saddle again. Since the groove will generally be very shallow, this procedure will not noticeably affect the action.
A bridge pin is dislodged during a string change
Take care to kink the string slightly at the ball end before feeding it into the bridge slot and then push the bridge pin firmly home. Should the bridge pin lift during tuning, you may press it home with your thumb.
My guitar’s finish is scratched or dented
My high gloss finish has a milky sheen
The screw of the strap button has loosened
Cracks in the Body or Neck of the Guitar
The fret edges protrude or feel sharp
Lakewood Customshop 5
How do I order a Custom shop guitar?
With our 3D Guitar Designer, you can put together your very own dream guitar.
The best way to start is by visiting a Lakewood dealer near you – or coming directly to us – to try out a few guitars and see which neck width, scale length, body size, and wood combination might suit you.
If you have any questions while designing your guitar, feel free to contact us directly or get in touch with your trusted dealer.
Afterwards, you have two options:
You contact your dealer, send them the PDF by email or submit an order request directly through the Guitar Designer.
You contact us directly, clarify any remaining questions, and – if there’s no music store near you – you can order your guitar straight from us.
Please use the contact forms provided in the Guitar Designer overview for both options. This is the only way to ensure that all necessary details are communicated.
Alternatively, we can forward your order to a Lakewood dealer on your behalf.
The production of a Custom Shop guitar takes about 3 months – depending on the complexity of your instrument, regardless of how you place your order.
Can I select the wood for my Custom shop guitar from the Lakewood stocks?
First of all, you can always trust that we select only high-quality wood for your guitar – thanks to our many years of experience. With some exotic woods, the texture can vary quite a lot. So if you place special value on color and grain, feel free to give us a call for advice or even come by the workshop to select the wood for your guitar in person. Please note: an appointment is required for this.
You’ll also find a gallery on our website with a selection of very special woods. These have been handpicked and photographed by us because of their exceptional technical qualities and visual beauty. You can choose one of these exclusive woods for your custom shop guitar – and rest assured that a truly special instrument will be created just for you.
Can the form and construction of Custom shop guitar be altered?
However, our 3D Guitar Designer gives you an incredibly detailed way to customize your guitar according to your wishes – you’re bound to find what you’re looking for!
If you still have additional requests, just give us a call or send an email to info@lakewood.de.
Is it possible to do a personalized inlay?
We also create custom inlays on request – from alternative fretboard markers and your own signature to complex shapes or designs. From simple one-color elements to elaborate multi-colored artworks. Made from mother of pearl, abalone, various woods, gold, or all kinds of natural materials.
In our photo gallery, you can take a look at some examples of custom fretboard inlays.
Interested? Got a specific idea or just a rough vision of something truly special? Then send us an email at info@lakewood.de or give us a call!
Together, we’ll create something truly unique.
And by the way: we can also add your inlay idea to a guitar you already own – whether it's a Lakewood or a guitar from another maker.
What are the special attributes of bear claw spruce?
"Haseln" are visual features in spruce wood that appear as cross-grain figures running across the fiber direction.
So far, there is no clear scientific explanation for how exactly this hazel figuring develops.
Spruce tops with many "Haseln" are often harder than regular spruce tops, which allows them to be crafted slightly thinner. This can improve the guitar’s responsiveness.
Their special appeal lies primarily in their unique visual character.
Carefully selected, each of our hazel-figured spruce tops is one of a kind – and forms the basis for a truly special guitar.
Wood, construction and materials 21
Which tone woods are used for Lakewood guitars?
You can explore the Wood Assistent of the Lakewood Customshop to learn about all the woods we use, their characteristics, and how they’re applied in building our guitars.
You’ll also find some very special tonewoods in our Gallery-Woods.
Is the timber used by Lakewood from sustainable forestry sources?
How long is the storage and curing period of tone woods?
Can cured wood still distort?
What is the difference between AAA and AAAA tops?
AAAA tops are slightly more evenly grained, have an optimum relationship between weight and stability and are slightly stiffer. Consequently, they have better tonal potential.
What is the difference between AA and AAA Rosewood?
Does a cutaway affect tone?
Can the open-pore finish provide adequate protection for my guitar?
What are the advantages of a high-gloss finish?
By the way, satin finish and high-gloss varnishes are of an almost identical thickness.
Does the installation of a Pickup System alter the tone?
Which tuners are used by Lakewood?
What material is used for the nut and bridge?
What is the composition and gauge of our fret wire?
How are Lakewood guitars lacquered?
Open-pored matt finish
This finish is standard for all instruments in the ‘Natural’ series.
Back, sides and neck receive two coats of polyurethane primer. The top receives a total of five coats of primer, each of which is rubbed down. After hardening, all surfaces are carefully rubbed down and then finished with two coats of polyurethane matt lacquer. Despite visible pores on the back, sides and neck, the lacquer surface is permanently sealed.
Closed pore satin finish
This is the standard finish for necks in the ‘Deluxe’ and ‘Premium’ series and is offered as an option for guitar bodies in the Custom Shop. All surfaces receive two coats of polyurethane primer. After the interim rub down, a transparent pore filler is applied which is hardened by means of UV light. This is followed by three coats of UV curing acrylic lacquer. Then all surfaces are carefully rubbed down and finished with two coats of polyurethane matt lacquer
High Gloss Finish
This is the standard finish for bodies in the ‘Deluxe’ and ‘Premium’ series and standard for the upper headstock surface of ‘Premium’ instruments. All surfaces receive two coats of polyurethane primer. After an interim rub down, a transparent pore filler is applied which is hardened by means of UV light. This is followed by three coats of UV curing acrylic lacquer. Then, after a further rub down, another three coats of UV curing acrylic lacquer are applied which are finely rubbed down and machine polished to the final high gloss finish.
Sunburst and Black Lacquer
With these finishes, the colour is introduced during the lacquering process into one of the coats. This is then protected by the subsequent coats of transparent lacquer.
Is there a difference in tone between matt and high gloss guitars?
Is there a risk of damage to the finish of a Lakewood guitar from rubber or synthetic materials used in guitar stands or wall brackets?
What is the Lakewood body-to-neck connection?
The neck is connected to the body by way of 2 bolts and the fret board is glued to the soundboard. In this way, a perfect, tight connection is established which may readily be opened, if necessary, for purposes of service.
What glue does Lakewood use?
What strings are Lakewood Guitars equipped with?
6-string guitars
D'Addario XS .012-.053 Phosphor bronze (.012 .016 .024 .032 .042 .053)
12-string guitars
D'Addario XS .010-.047 Phosphor bronze (.010|.010 .014|.014 .023| .008 .030|.012 .039|.018 .047|.027)
Baritone guitars
D'Addario XT .016-.070 Phosphor bronze (.016 .022 .029 .048 .060 .070)
Nylon string guitars (Crossover)
D'Addario XT Classical Hard Tension
Which pickup system does Lakewood use?
Which pickup systems did Lakewood use in the past?
1987-1990
Electronics by AER with volume, bass and treble attenuation by means of three pots located adjacent to the neck joint on the upper bout. Internal holder for a 9v battery. Transducer 091 by Shadow.
1991-1994
Electronics MK-2 by AER with volume, bass, mid and high frequency attenuation. Individual volume adjustment for each string. Operating console located below the waist on the upper side of the guitar. Externally accessible holder for 2 x 9v batteries, located adjacent to the endpin. Transducer Type 066 polyphonic in 80mm and 84mm length by Shadow.
1991-1995
Electronics MK-1 by AER with volume, bass and treble attenuation. Operating console located below the waist on the upper side of the guitar. Externally accessible holder for 1 x 9v battery, located adjacent to the endpin. Transducer Type 066 monophonic in 80mm and 84mm length by Shadow.
1996-1997
Electronics MK-3 by AER with volume, bass, mid and high frequency attenuation. Parametrically adjustable notch filter. Operating console located below the waist on the upper side of the guitar. Externally accessible holder for 1 x 9v battery, located adjacent to the endpin. Transducer Type 066 monophonic in 80mm and 84mm length by Shadow.
1998-2002
B-Band Core with internal battery pouch for 1 x 9v battery. No volume or tone adjustment.
B-Band Core + Microphone with internal battery pouch for 1 x 9v battery. No volume or tone adjustment.
B-Band New Frontier with volume, bass and treble attenuation. Operating console located below the waist on the upper side of the guitar. Internal battery pouch for 1 x 9v battery.
B-Band New Frontier + Microphone. Volume, bass and treble attenuation plus microphone blender. Operating console located below the waist on the upper side of the guitar. Internal battery pouch for 1 x 9v battery.
2003
B-Band A-3 with Volume, bass and treble attenuation. Operating console located below the waist on the upper side of the guitar. Internal battery pouch for 1 x 9v battery.
2003-2005
B-Band A-1 with internal battery pouch for 1 x 9v battery. No volume or tone adjustment.
2003-2005
B-Band A-6 with volume, bass, mid and treble attenuation. Parametric presence adjustment. Notch filter. Blend regulation for two pick-ups. Operating console located below the waist on the upper side of the guitar. Externally accessible battery holder for 1 x 9v battery adjacent to the endpin.
2004-2005
B-Band A-5 with volume, bass, mid and treble attenuation. Parametric presence adjustment. Notch filter. Blend regulation for two pick-ups. Operating console located below the waist on the upper side of the guitar. Externally accessible battery holder for 1 x 9v battery adjacent to the endpin.
2006-02/2012
Lakewood Sonic System, manufactured by Shadow. Volume and tone adjustment. Switchable Notch filter. Blend regulation for piezo-ceramic under-saddle transducer and magnetic fret board pick-up. Operating unit with battery located under sound hole rim.
2006-02/2012
Lakewood Classic System, manufactured by Shadow. Volume and tone adjustment. Switchable. Operating unit with battery located under sound hole rim.
2006-02/2012
Lakewood Mini Sonic System. Volume and tone adjustment. Operating unit with battery located under sound hole rim.
Further information on the Sonic System and the B-Band Systems can be found in the chapter Pickup systems we fitted in the past.
Care and maintenance 21
How do I care for the varnished surfaces of my guitar?
How do I care for the unvarnished fret board of my guitar?
How do I restring my guitar?
Guitar strings are secured by means of bridge pins which fit into the slots of the bridge at one end and by way of a hole in the shaft of the machine head (tuner) at the other end. The quality of these securing parts is fundamental to the tuning integrity of the guitar.
Securing strings at the bridge end
The strings are inserted into the slots of the bridge by means of suitable pins. Kink the ball-end of the string slightly before inserting it into the slot. Then press the pin firmly home into the slot, taking care to face the channel of the pin in the direction of the sound hole.

Now, by tightening the string, the ball-end will be wedged by the pin against the bridge plate on the underside of the sound-board.
Should the pin at any stage move upward, simply push it gently (but firmly) back home. The pins are not unduly forced so that they may be removed freely when the string tension is released.
Securing strings at the machine heads
Guitar strings are made longer than required and it is not advisable to wind the entire length onto the tuner shaft. With flat headstocks, strings are easily accessible while slotted tops make this somewhat more difficult.
With flat headstocks start with the e-1 string and put 2 loops onto the tuner shaft winding from inside to outside.
Take care to hold the string tightly and wind from the bottom of the shaft towards the top end.Then thread the string through the hole again.
This second threading of the string will prevent slippage during the tuning process. It is only required for the unwound e-1 and b-2 strings.
Now use a string winder to tighten the strings. The final tension is only decided when all strings have been tightened. The tightening sequence is as follows: e-1, b-2, g-3, E-6, A-5 and lastly D-4. Although this sequence has been proven, it is not obligatory.
The wound g-3, E-6, A-5 and D-4 strings may be passed through the hole in the shaft only once and then clipped off.
When all strings have been fitted, you can proceed with tuning. Since all strings will settle at both ends, stretch each one after the initial tuning, by pulling gently. The tuning will flatten and a second pass will be needed. This may be repeated a few times, as required, until the strings hold their pitch. (Tip: whenever tuning your guitar, gently stretch the strings first; they may have slipped overnight for climatic or temperature reasons and you may find that they are in tune or nearby after the stretch!).
Lastly, you may clip excess string ends as close to the tuner shaft as possible, to avoid injury.
Strings may remain a little unstable in the first few days after fitting but will then settle and hold their pitch.
With slotted headstocks insert the string through the headstock slot, pass it around the shaft and back through the slot again from behind. Now stick the string end through the slot again (see diagram below)
before finally threading it through the hole.
You may want to thread the unwound strings through the shaft hole a second time to secure them more firmly, as described above for flat headstocks.
Now the strings can be tightened by means of a winder to a point where they are firm in the nut and on the tuner shaft, albeit not yet at concert pitch. As with flat headstocks, strings are tensioned in the following sequence:- e-1, b-2, g-3, E-6, A-5 and lastly D-4. All strings should wind onto the shaft toward the outside of the headstock (see diagram).
 Now tune and stretch the strings as described above for flat headstocks. Finally, excess string ends can be clipped, taking care not to damage the wood with steel tools.
Where should I store my guitar?
What should I do when undertaking air travel with my guitar?
Are there specific guidelines if I take my guitar to another climate zone?
Lakewood guitars are built under controlled climate conditions, which makes them relatively resistant to changes in humidity.
However, extremely dry or humid environments can still affect the natural materials and the structural integrity of the guitar.
During such periods, your instrument is best kept in its case.
Combined with a D’Addario Humidipak, your guitar will enjoy the perfect climate inside the case.
Is damage caused by extreme humidity or temperature covered by the Warranty?
Is it useful to use (de) humidifiers?
As a first step, it’s enough to get a good-quality hygrometer. With this, you can check whether your room actually needs humidifying or dehumidifying.
Especially during the heating season in winter, room air can become very dry. If that’s the case, we recommend either using a room humidifier or storing your guitar in its case together with a D’Addario Humidipak.
We suggest using humidifiers from the company Venta, such as the Venta Airwasher LW25.
Make sure the humidifier is suitable for the size of your room! It's essential to monitor humidity levels with a hygrometer to avoid creating an environment that’s too humid.
In particularly humid rooms, using an air conditioner and/or a dehumidifier may also be a good idea.
Is it worthwhile buying a Hygrometer?
Please note that most hygrometers – whether analog or digital – have high tolerances and can display inaccurate values.
That’s why it really pays off to invest in a good hygrometer.
Should the string tension be reduced if the guitar will be out of use for some time?
How can I measure and adjust the action of my guitar?
General
The gap between the strings and the frets is referred to as ‘the action’. Note that this is not the distance between the strings and fret board. Also, in determining the action, the gauge of the strings is not relevant. Essentially, it is the clear gap between the strings and the frets which is generally measured at the 12th fret for the e-1 and E-6 strings.
The action plays a role as to the playability of the guitar, but also influences playing dynamics. For this reason, generally applicable parameters are not mandatory – one size does not fit all; action is a personal choice.
At Lakewood we endeavor to set up our guitars so as to suit the preferences of the majority of Players.
Measuring the action
Important: before altering the action, check the neck with regard to the truss rod which may require adjustment.
See more on this at How to adjust the truss rod?
For measurement of the action, you will need a short ruler - but a 20 and 50 Eurocent coin will do the trick too!
As mentioned, the action is measured as the clear gap between string and fret at the 12th fret. For average playing dynamics and light gauge strings (.012-.053 inch) the generally accepted values are 2,0mm for the e-1 string und 2,5mm for the E-6 string. These gaps can either be determined by way of a ruler
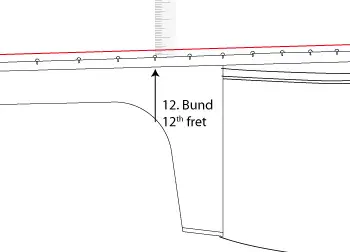
or very simply by means of suitable coins.
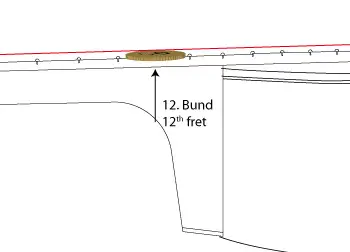
For the e-1 and an action of 2,0mm the 20 Eurocent coin is perfect and for the E-6 string with an action of 2,5mm, the 50 Eurocent coin does the job. If you can just slide the relevant coin into the gap, you will have achieved a 2,0 – 2,5mm action.
Adjusting the Action
Should you want a lower or higher action, this will be subject to certain limits.
The strings require room for unimpeded oscillation and this will restrict your desire for a very low action. This may be depicted graphically as follows:

So, to adjust the action, the saddle height will need to be altered. This is achieved by adding to or subtracting from the bottom of the saddle insert. This difference is calculated at twice the value to be added to or subtracted from the gap at the 12th fret.
Adding to the saddle height can be achieved by means of a suitable shim to be placed on the pickup element.
Lowering the saddle is done by carefully removing material from the bottom of the saddle insert. In doing so, great care must be taken to retain the absolute evenness of the bottom surface. Failure to do so will impact on the acoustic qualities of the guitar and/or its performance via the pickup. Take the advice of a technician if you are unsure about this procedure.
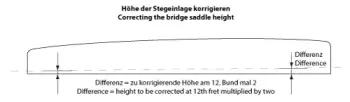
Should a materially higher action be required, this may impact the bridge, depending on type and geometry. The saddle insert should not protrude by more than 6mm over the surface of the bridge. A higher saddle insert would result in too acute an angle for the strings.
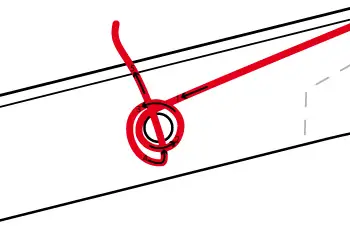
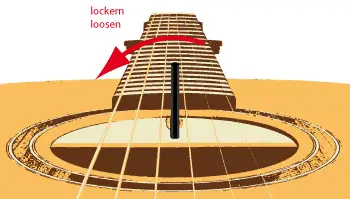
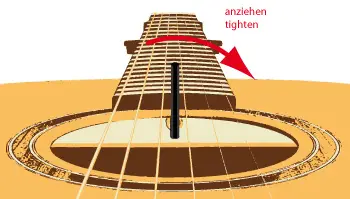
How do I adjust the truss rod?
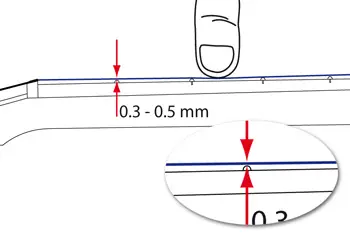
Lakewood guitars have an adjustable truss rod which is located under the fret board. The 5mm adjusting hex-nut is accessible via an aperture in the brace between the sound hole and fret board. Adjusting the truss rod affects the relief (bend) of the fret board. When correctly set, the fret board will have a slight, concave bend. The truss rod’s purposes is to stabilize the neck and fret board but should not, as a rule, be used to adjust the action.
To adjust the truss rod, you will need the following:
- Capo
- 5mm, long arm hex wrench (Allen key)
- Feeler gauge, 0.5 mm thick
To adjust the truss rod, proceed as follows:
1. Place the capo on the 1st fret.
2. Fret the bass E string at the 14th fret.
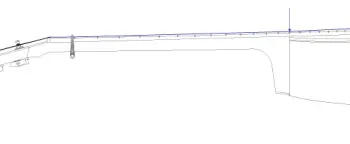
3. Insert the feeler gauge at the 7th fret between the bass E string and the fret wire (img. 2)
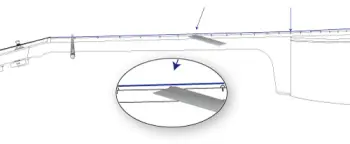
A. If the feeler gauge fits into this gap snugly, the truss rod is correctly set up.
B. If the gap is too narrow, the truss rod needs to be loosened. Start by loosening one quarter turn (anti-clockwise) and then check the gap again with the feeler gauge. Repeat the process if required.
C. If the gap is too large, the truss rod needs to be tightened. Start by tightening one quarter turn (clockwise) and then check the gap again with the feeler gauge. Repeat the process if required.
In case you feel unsure about adjusting your truss rod - feel free to reach us by mail or phone!
How do I adjust the L.R. Baggs Anthem System
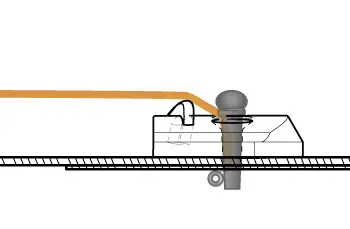
The L.R. Baggs Anthem System is fitted with two signal sources. The “Element” pickup, as an under-saddle transducer, is completed by the “Tru · Mic”, which sits fixedly mounted to the top inside the guitar right underneath the bridge. Both sources of this audiophile system convey the natural tone of your guitar - no more and no less.
1. Mix control (mixes between mic and bridge pickup)
When the mix control is rolled toward the neck, the internal microphone (Tru · Mic) is carrying the majority of the guitar’s voice with the Element pickup supporting only the lowest frequencies of the over-all sound. When rolled toward the bridge, you will hear the full-range Element pickup only.
Feel free to experiment with different positions as there is a wide range of great sounding and useful settings.
2. Phase inversion
For inverting the phase of the output signal in relation to the vibrating string you may press the phase button. Most of the time one of both possible settings will sound better and/or provide the best feedback resistance.
We recommend trying both settings each time you set up.
3. Volume control
Roll this wheel toward the neck to increase the volume or toward the bridge to decrease the volume.
4. Battery check & battery pocket
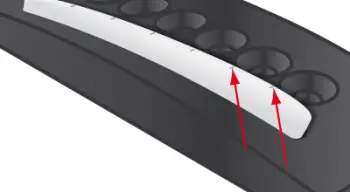
The L.R. Baggs Anthem System is powered by an off-the-shelf 9V block battery. Press the button (4) to check remaining battery life. A full battery will light up all 5 at the beige top rim inserted LED’s (4.1) and should give you approximately 170 hours of playing time. When only two lights are lit, you have about 8 hours of normal playing time left. If eventually only one light is lit, replace the battery.
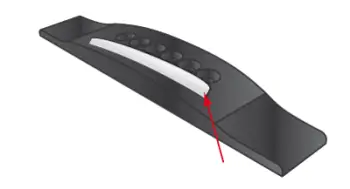
The battery is housed in a soft-shell pocket near the neck block inside the guitar body (see fig. 2).
When changing the battery, please loosen the strings first. You will now easily get one hand into the guitar for opening the pocket and pulling out the battery afterwards. Pull the connector clip carefully off the battery contacts and re-attach it on the new battery. Set the new battery back into the battery pocket and close the Velcro fastener. Take particularly care not to strain any cables inside the guitar unnecessarily while doing the battery replacement.
To maximize battery life, make sure to unplug your instrument cable every time you are not using the pickup system or when you put the guitar aside. The battery check will work even when there is no cable plugged in.
5. Adjusting the mic level
For adjusting this control you will need a small jeweller’s screwdriver. Setting this control correctly is vital to the sound of the Anthem System.
First, you must turn up the mix control (1) entirely by rolling it towards the neck. Now play through a P.A. or acoustic amplifier while you are making adjustments at the mic level trim pot (5). Your amplified tone should be well balanced and true to the acoustic sound and feel of the guitar. If it lacks clarity and top-end, increase the mic’s level by turning the mic level control clockwise. Back it off slightly if you experience excessive handling noise and/or brightness.
Please note: We already pre-configured the mic level of the L.R. Baggs Anthem System in our workshop during the setup process to a well-working, medial setting. Please make your first experiences with this adjustment before you decide personalizing and modifying your setup.
Further details and illustrations in the user's guide on the download area page.
What is the Operating Duration of the L.R. Baggs Anthem Pickup System?
How do I install the second strap button?
You'll find a manual for this in the download area.
How the nut can be checked
General
The nut is located at the top end of the fret board at the point where the fret board joins the head stock. The purpose of the nut is to position the strings in the correct spacing from each other from the fret board edge and at the correct height above 1st fret. The precision of the nut is a prerequisite for perfect playability and comfortable action, especially with unfretted or ‘open’ strings. The notches guide the strings without choking them during tuning.
Checking the notches
Strings must be at the correct clearance above the 1st fret. To determine this, fret each string with your ring finger at the 3rd fret and simultaneously lightly tap the string with your index finger at the 1st fret, checking the gap between string and 1st fret (see diagram). The gap should be the thickness of a business card. After a while your eye will focus more readily on the affected area and you will be able to assess the gap more easily.
Correcting the nut
For technical reasons, a correction of the nut will not be possible for you. However, should your guitar’s nut require adjustment, please contact service@lakewood.de for assistance. Unlike a bridge insert, nuts cannot be delivered for fitment by the player since each one is uniquely finished for its guitar. For this reason, the correction or exchange of a nut requires a luthier‘s expertise.
Problems and questions
- A deviation is detected when checking the nut.
Answer: please contact service@lakewood.de - The nut has come loose during restringing.
Answer: The nut is simply held in place by means of a small amount of wood glue. You can refix it into the correct position by means of a drop of glue, taking care to place it centrally and hard against the fret board. - What is the material from which a guitar nut is made?
Answer: Argentinian bleached cattle bone. - What can be done about strings which catch in the nut during tuning?
Answer: depending on string gauge and composition, strings can catch in the nut grooves. This can be reduced by rubbing the offnding groove with graphite (pencil lead). - Some strings rattle when played open. What has happened?
Answer: Over time, the grooves have been deepened due to repeated tuning. The nut must be repaired or replaced. As the nut is wearing part, this is not covered by the warranty.
How the saddle can be checked
General
The saddle is located in a diagonally positioned, backward sloping slot in the bridge which also anchors the strings. The saddle transmits the string energy to the bridge which in turn sets the sound board (or top) in motion. In this way, the oscillation process is initiated – a process for which precise saddle positioning is fundamental to ensure tonal quality.
The saddle height can be adjusted in order to facilitate string action
The saddle fits snugly into the slot in the bridge, without sticking.
The strings are guided over the saddle, equidistant from each other and it is normal for slight grooves to form at the points of contact, over time.
This can be corrected by means of fine (320-400) sandpaper. For this purpose, release the strings from the bridge and then remove the saddle, pinching it between index finger and thumb. Holding the saddle in one hand, with the other hand gently sand the curved surface until the grooves disappear. To provide a smooth finish, the affected area can be polished with tooth paste (the brand is up to you!).
Finally, replace the saddle into its slot, taking care to position the higher end on the upper (bass) side.
Questions
- What is the material used for saddles?
Answer: Lakewood saddles are made from bone. - Can I use other saddle materials such as Tusq, Corian or brass?
Answer: If the replacement saddle fits the slot perfectly you can use alternative materials. - Can I get a new saddle for my guitar?
Answer: Yes you can obtain a new saddle from service@lakewood.de.
Care and maintenance of the Machine Heads (tuners)
The tuners are fixed to the head stock. Closed-housing tuners are secured by way of a 10mm hexagonal nut which holds the bearing of the tuner post against the head stock top, while the housing is held to the back of the head stock by way of a small screw. These fastenings can loosen over time. To retighten the hex nut, use a 10mm open spanner in a clockwise direction. The strings do not need to be loosened. For the small wood screw holding the housing, a fine Philips screwdriver is needed. Neither of these fastenings must be over tightened. Simply ensure that the tuner housing is secure and does not move.
Tuners without a housing (open) are secured by a bearing tube. By applying lateral pressure, check whether this tube is loose. If so, remove it with your fingernail. Then apply a small drop of domestic glue and re-insert it into position.
On guitars with a slotted head stock, the tuners are positioned by way of holes in the flanks and middle of the slots which obviate the need for metal bearings.
The base plate for open tuners are fixed to both flat and open head stocks by way of 2 small Philips wood screws. Check these periodically and tighten gently, if necessary. The wood screws should always be in contact with the tuner base plate.
The knobs of open tuners are held in place by means of glue. The bond can be checked by tuning the string; if loose, it will be difficult or even impossible to tune the string. The knob will turn on the pin and may even be pulled off. Applying a minimal amount of ‘superglue’ into the hole, the knob can be replaced onto the pin. Wait a while before using that tuner again.
The knobs of tuners with housings are attached by screws which can be tightened by means of a Philips screwdriver. The tightness of these screws determines the ease of operation of the tuner. If over tightened, the tuner will be hard to turn; if it is too loose this may lead to vibration noise and cause poor tuning stability.
Wooden tuner knobs have a metal sleeve which could loosen. This may lead to difficulty in tuning the affected string and may also cause vibration noise. In this case, it will be necessary to remove the knob from its sleeve. Tune the string down at least one full tone and loosen the screw at the outside of the tuner knob with a suitable screwdriver. Take care, when removing the knob, that the two washers of metal and plastic respectively, remain on the tuner pin. These washers are essential for the proper functioning of the tuner. After removing the tuner knob, separate the metal sleeve, apply a drop of ‘superglue’ and then reassemble the knob and sleeve.
Chromed and gilded tuners are made in one piece and have no sleeve.
How do I apply a Pickguard?
‘Pickguards’ or ‘scratch plates’ protect the soundboard near the soundhole and are available in various materials in the Customshop and also separately as Lakewood accessories. We offer synthetic tortoiseshell, ebony and rosewood models. All pickguards are self-adhesive and remain permanently attached. Removing the pickguard must be performed by a professional and it must be noted that the area beneath the guard will be lighter in colour due to a lower exposure to UV rays.
Application of the pickguard
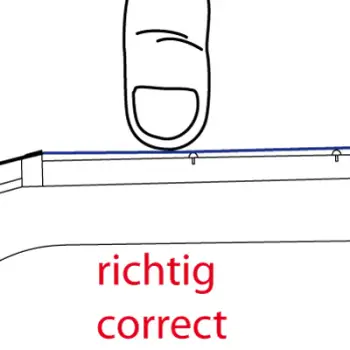
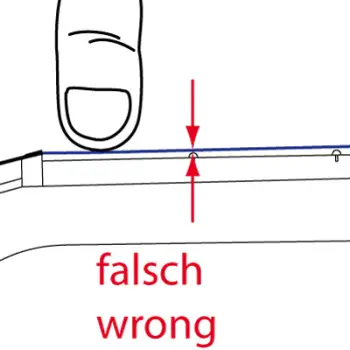
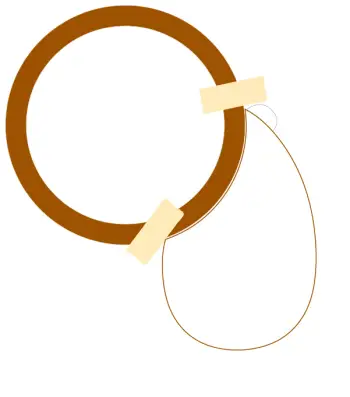
 Place the pickguard into the desired position on the soundboard but do not yet remove the protective film on the back. Position the pickguard along the sound hole rosette longitudinally as shown in diagram 1.
 Then mark the location of the pickguard’s corner positions by means of adhesive tape, as demonstrated in the diagram.
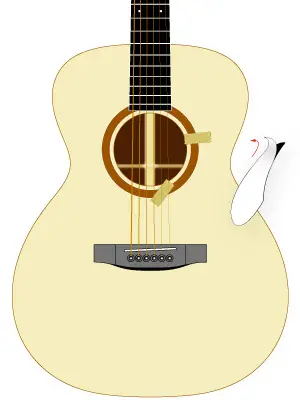 Remove the pickguard, leaving the adhesive tape markers in place on the soundboard. Now remove the protective film from the back of the pickguard and place the corners of the pickguard against the rosette at the marked positions as per the previous step. Then press it firmly flat onto the soundboard.
 Please note that you only have one attempt to correctly position the pickguard as it cannot be shifted after application.
Measuring and optimizing octave accuracy
General
Octave accuracy is defined by the intonation of the strings at the 12th fret of the guitar. The precision of octave intonation will determine the practicability of the guitar; if this is inaccurate, the guitar cannot be correctly tuned. However, playing technique and string tolerances permit only a theoretical optimum. In reality, one cannot expect complete octave accuracy.
This is important to know - but no drama.
Measurement and evaluation
The measurement is done by comparison of the harmonic and the fretted note at the 12th fret. A harmonic arises by placing the fingertip on a string and then plucking the string while simultaneously lifting the fingertip. The overtones created by this technique arise only at certain points on the string, such as in this case, the exact midpoint being at 12th fret.
Take care not to place too much down or side pressure on the fretted note.
The frequency of both notes will in the optimal case be identical. You will be able to distinguish even subtle differences if your ear is well trained. But for a more precise evaluation, you should use a tuner with which you will be able to measure octave accuracy and deviations for each string. Deviations of +/- 5 Cent are acceptable.
Make a note of the deviation between the harmonic and fretted note for each string. Repeat the process a few times in order to obtain an average which is independent of playing technique.
e-1: -5 Cent
b-2: +1 Cent
g-3: +/- 0 Cent
D-4: -5 Cent
A-5: -5 Cent
E-6: -1 Cent
This indicates that a correction for octave accuracy is required for the b-2 und E-6 strings. How is this achieved?
Optimisation
Let us return to the bridge; this follows the curvature of the fret board and lies approximately 1mm lower on the treble side than on the bass. The bone saddle inserted into the bridge is approximately 2.5mm wide and the strings run over the peak which lies in the middle of the saddle.
To achieve a correction of the octave for individual strings, the point of contact between that string and the saddle must be moved. If your tuner shows a positive deviation (+ Cent) in the frequency, the point of contact must be moved away from the sound hole. In the case of a negative deviation (- Cent), the point of contact needs to be moved closer to the sound hole.
You may be wondering whether such small adjustments can achieve the required goal and we can assure you that they do. For a deviation of +10 Cent, the contact point needs to be moved 0.75mm away from the sound hole.
The tools and procedure necessary for adjustment of the saddle may not be available to you. Please contact service@lakewood.de for an optimized saddle suited specifically to your guitar. In addition to your address, please provide us with the current height of your saddle plus the tuning values that you measured with your tuner.
The cost of a saddle is 25 Euro, plus additional shipping costs.
Problems and Questions
With some strings there is a large discrepancy between the two tones.
Answer: there is probably a fault in the string material; this may also apply to new strings, due to possible manufacturing variations.
Change out the affected string before re-testing the tuning.
- There are large discrepancies on all strings.
Answer: this can also be due to a string problem. If you have excluded this possibility, please contact service@lakewood.de. - Do the established tuning values apply to all strings and string positions (action)?
Answer: No, depending on string-type, gauge and action, the values will vary slightly.
How do I apply the new transparent Lakewood Pickguard?
Tutorial Video
Easiest of all will be for you to take a moment to view our tutorial-video in which we provide a step-by-step procedure for you to apply the pickguard onto the guitar soundboard without any complication.
Application of the pickguard in 4 easy steps
Step 1
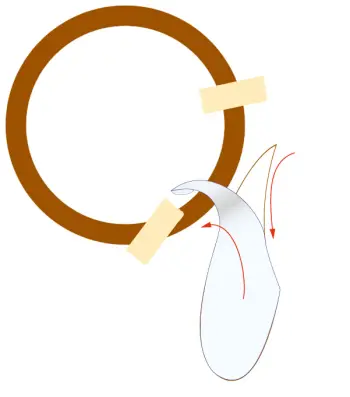
First clean the soundboard surface with a cloth (e.g. the Lakewood microfiber cleaning cloth). If necessary, use a cleaning agent which will not leave any greasy, oily or silicone residue on the surface which must ideally be dry and dust-free.Place the pickguard onto the soundboard without removing the protective film. In this way it will not yet adhere and can be positioned freely. Find the desired position by sliding back and forth. Optically important is to ensure that the concave section of the pickguard fits precisely along the soundhole rosette line. For Lakewood guitars this radius fits perfectly. Should you have another model, this must be achieved by approximation.
When you have determined the correct position, mark two reference points (preferably the two "corners" of the pickguard as pictured) by way of sellotape. This will enable you to return to the same position later.
Step 2
Take the pickguard and, using the tab, remove the protective film from approximately half of the pickguard.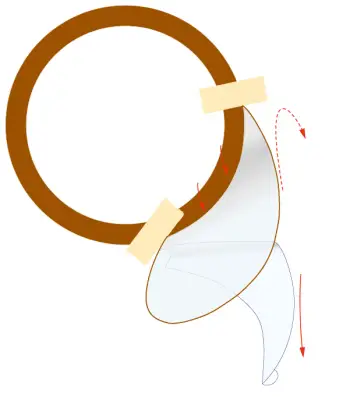
Step 3
Now place the corners of the pickguard against the taped reference points onto the soundboard surface, starting with the "sharper end". Keep the other end of the pickguard clear, without kinking it. When it is in position, press the pickguard onto the soundboard surface while simultaneously removing the rest of the protective film. Guard against air pockets and small dust particles.
Step 4
Now you have completed the application of the pickguard.Should air pockets have persisted, work these carefully away to the edge with your finger, taking care not to dent the delicate soundboard surface.
Lastly, remove the marker tapes from the soundboard and once again clean the surfaces, checking whether all has been correctly done. If not, don’t despair – you can simply repeat steps 1-4.
Note
Note: despite due care on our part, the pickguard cannot be guaranteed for complete UV-transparency. Over time slight wood coloration differences may arise on the affected area which means that there may be a lighter colour tone where the pickguard was placed.
Technical Data
We would like to furnish you with the following data for the pickguard as provided by the supplier. These are given without any warranty.
Lakewood Guitars GmbH " Co. KG does not take any liability for possible lacquer intolerances.

Optical property
| Property | Test Method | Result |
|---|---|---|
| Transmittance (400-700nm) | Transmittance tester | Ave. 94 |
| Transmittance (400-700nm) | Spectrophotometer | Ave. 94 |
Physical property
| Property | Test Method | Result |
|---|---|---|
| Pencil hardness | 500g (ASTM D3363 / JIS K5600) | 8H |
| Surface abrasion | Steel wool (#0000) at 750g/cm3 (ASTM D1044) | No scratch |
| Adhesion | 10x10 sections (ASTM D3359 / JIS D0202) | 100/100 |
Note: Values assigned represent the results of tests conducted and are not standard values guranteed.
Chemical resistance
| Property | Test Method | Result |
|---|---|---|
| Ethanol | The chemical was deposited on the surface of the coating and allowed to stand for 30 minutes at room temperature. Then the chemical was wiped off and the coating sample evaluated. | No remarkable change. |
| IPA | No remarkable change. |
Note: The change of the optical and physical charachteristic between before and after test was measured.
Status: August 2016

Workshop Tour
Once a month – always on the second-to-last Friday – we open our doors to visitors. Between 10 a.m. and 4 p.m. you can drop by. The guided tour starts at 10:30 a.m. and lasts about 2 hours.Experience firsthand how our guitars are built, get to know the tonewoods, and ask your questions directly on site. You can try out guitars, purchase guitars and accessories, or simply get advice on the Customshop.
Participation is free of charge, places are limited to 18 people.
Next available date with open spots: 21 Aug 2026 Sign up now